 |
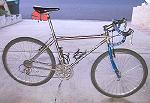
Inspired by Arkansas dirt roads, but without the latitude to add a new cross bike to his stable, Ed Morris set about assembling one from an old MTB frame and the contents of his spares box. He found that it's not straightforward, but that all problems are solvable with a bit of thought and your friendly local bike shop.
|
When my parents retired they moved to the Ozark Mountains in Arkansas, which is a beautiful part of the U.S. During my visits I've been able to ride some incredible trails in the area, but unfortunately, the trail riding is a two to three hour drive from where they live. While road riding closer to my parent's home I noticed lots of unpaved roads that wound off the pavement into the local mountains. I tried riding them on the road bike, but the conditions proved to be just too rough. When I was visiting with my mountain bike, I could of course easily ride them. But when I got back on the pavement, the mountain bike had its obvious drawbacks. The ticket to exploring these back roads would be a cyclo-cross bike of course. But the problem was, I didn't have one. And with 10 bikes already in my garage, trying to sell my "significant other" on the idea adding a cross bike to the collection, no matter how practical in my view, didn't look promising.
The tradition and origins of cyclo-cross go back to the days when guys took an old frame and built it up out of whatever spare or leftover parts they had. The idea was, why spend a bunch of money on a nice bike when you're just gonna thrash it in the mud? Of course, somewhere along the way, probably with the advent of $2000+ mountain bikes and the rising popularity of cyclo-cross here in the U.S., that idea got lost. Complete, ready-to-race cross bikes, as well as high end frames, are the norm now. And even though there are very good cross bikes available from $700-1000, this was still way beyond any amount I could spend. In the spirit of those early 'crossers, I decided to see if I could come up with a bike out of my spare parts junk pile while trying to keep the out-of-pocket cost to around $100. And hopefully my wife wouldn't object too much to another bike in the garage, since it had already been there, just in pieces!
Of course first you've got to have a frame. It would be nice to have a standard 700c wheel cyclo-cross frame to start with, but after checking eBay and other internet sources I didn't have any luck finding even a used frame, much less a new one, for under $150. Of course that blew my $100 budget right out of the water. Then I thought, could one of my old mountain bike frames that I kept as a spare be turned into a workable cross bike? I had a good quality steel MTB frame with plenty of miles left in it, so I decided this would be the starting point of the project. Besides, I remembered seeing John Tomac racing a mountain bike with drop bars years ago, so I figured it should be doable.
|
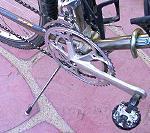
Since I planned on riding the bike mostly on paved and unpaved roads, I wanted to use a double chainring road crank so that I would have taller gearing than triple ring mountain bike cranks would provide. Besides, no self respecting cyclo-cross bike has triple rings! This turned out to be the most problematic part of the project.
The chainstays on a mountain bike are wider to accommodate fat tires, so using a road crank with a chainring larger than 48 teeth, and not having it bind on the chainstays is the problem. After trying various cranks from my parts bin, in combination with all the leftover bottom brackets I had, I couldn't get anything to work. I thought my project was already derailed.
After thinking about it for a day or so and doing some measuring, I figured out a solution. Shimano Ultegra standard tapered cranks in combination with an adjustable 122mm bottom bracket would work. It's important to use an adjustable BB, because that feature will come in handy in adjusting the chainline to get the shifting to work properly, which I'll explain later. I was lucky because a bike shop mechanic friend just happened to have a used adjustable bottom bracket that was 122mm. If all you have in your spare parts are tapered low profile style cranks, chances are you won't get them to work. Unless you have a friend that's a machinist I doubt that you'll find a bottom bracket combination that will have the necessary clearance. Got some spare nine-speed splined cranks? Forget about it.
So the BB was my first out of pocket money I had to spend on the project: $35. But it was worth it, because it saved the project and worked so well. And it since the BB was titanium to boot, it added a nice touch to start out with. So that's Tip #1: Mountain bike frames vary greatly in the design of the bracket/chainstay area. If you can't find any BB/crank combination to work on the frame that you have, I suppose you can always give in and use a mountain crank, lose the inner ring and slap some bigger outer rings on it.
Once the cranks were on, the next problem was shifters. Of course I wanted to have drop bars on the bike and I had an old pair of eight-speed STI shifters a friend had given me. But mountain bike frames don't have frame braze-ons for derailleur cable stops, so how would I be able to get the front derailleur to work without the ability to fine tune it? Well it turns out there's a cycling product for every problem. A company called DaVinci Designs that makes a device called an INCA, otherwise known as an in-line cable adjuster. This little gizmo goes into the cable housing, allowing for fine adjustment of the derailleur. I would only have to use one, for the front derailleur, because the rear could be adjusted with its barrel screw. The INCA was $10, but easily solved another potential project-stopping problem.
Next came the remaining drivetrain parts, and I promptly ran into another problem. I thought it would be real easy to just hang all my old parts on the bike and ride it -- boy was I wrong! The rear derailleur wasn't a problem. I had a Shimano 105 rear derailleur that I had picked up off the bargain table a year ago for $15 as a spare to have on hand for backup. Even though I had never used it, I stuck it on and thought it was fair not counting it as money spent out of pocket.
It was the front derailleur that gave me fits. I have a shoebox full of front derailleurs of every model and manufacturer. None of them would work. Here is where that problem with the bottom bracket comes back into play. The wider BB that solved the crank clearance problem moved the chainrings out so far that a standard double ring front derailleur didn't have enough throw to make the shift to the big ring.
Okay, I thought, just use an old mountain bike derailleur. But that won't work on the larger chainrings because the angle of the cage is different. The answer was to use a triple ring road derailleur. Because it has more throw than a double chainring derailleur, it will make the shift. And here's where that adjustable BB comes in handy. You need to get the inner chainring as close as possible to the frame without binding on the chainstay to allow for good shifting. By combining the adjustable bottom bracket and the INCA-in line cable adjuster, I was able to achieve remarkably clean shifting between the two rings. There is chainring rubbing in some of the crossover gear ratios, requiring feathering the front shifter, but that's only a minor nuisance. But I had to buy a derailleur. Since I already was using a 105 on the rear, I purchased a 105 triple front for $25, which was the cheapest I could find.
I was now up to around $65 spent on my project and was maybe only halfway to having a rideable bike.
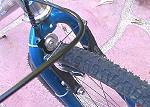
For a fork, I had a couple of spare suspension forks that I could use. But since I wouldn't be using it as a real "trail bike" and in the spirit of keeping it as close to a cyclo-cross bike as possible, I wanted to use a rigid fork. Since I didn't have any 26in rigid forks in my junk bin I made a trip down to my local bike shop. Here's Tip #2: work hard at cultivating a good relationship with your local bike shop, you never know when you might really need them. Over the years my local shop has accumulated a fairly large pile of rigid forks that have been taken off low end mountain bikes and replaced suspension forks as an upgrade. Scrounging through the pile I came up with a decent rigid fork that had the correct steerer tube diameter and even a good color match. I then used that accumulated good relationship that I mentioned and managed to talk them into giving it to me. So score a few points for that old cross spirit.
|
For brakes I had cantilever as well as V-brakes in the parts bin. Which to use? The canties would be more traditional, but the V-brakes that I had were in better condition, so I decided to use them. That meant I had to spend $30 for V-brake cable adaptors so they would work with the road levers.
I'm now right up to the $100 mark and it's still not rideable. I'm really hoping my spare parts bin holds up, and for the most part it did. The wheels, headset, bars, seatpost, seat, pedals, cable housing and cables all came out of the spare parts bin.
Next problem: none of the stems I had put me in a good position. How is in that I could have 10 stems and none of them were the right size? But I sorta lucked out again. I found one that was the correct rise and length on a bargain table for $15. So here's Tip #3: never pass up looking at what's on the bargain table.
I couldn't put an old chain on so I spent $15 for that. For cogs I had a 12-24 eight-speed cassette in my spare parts, but I quickly realized that the best set-up would be a12-28, eight-speed mountain cassette. All the 12-28s I had were really worn out, but that cluster would give me small enough gearing to be able to ride steep mountain dirt roads and most trails comfortably, and still give a tall enough gear for road riding without spinning my legs off. And the "spirit of cross" was still with me when a buddy gave me a used cassette that worked just fine.
So I'm now at $120 and I've got everything I need but tires.
Tires turned out to be the last problem in my project. Over the past few years, tire manufacturers have produced good quality, narrow, slick 26in tires for street riding. But if you want to combine road and light trail riding, finding a 26in cyclo-cross style knobby tire that's less than 1.5in or 35mm is hard. I really didn't want to put a wide knobby tire on because it wouldn't look like a cyclo-cross bike and I could just as well ride my mountain bike.
After searching numerous tire company catalogs and the Internet, I was starting to lose hope and figured I would have to settle for a road type mountain bike tire that at least had some tread on it. I then started looking at the tire selection in every bike shop in the area. Fortunately there are a lot of bike shops in Southern California. I finally found some inexpensive dual-purpose type tires that looked promising. They turned out to be made by Chen Seng, a huge Asian tire company that sells tires under many different brand names as well as their own. The ones I found are sold through the Avenir brand and are called "Swiss Army". They have a raised center ridge with knobs on the side. The raised center ridge makes for very good rolling on pavement, with minimum noise, and there are enough knobs to keep you upright in the dirt, as long as you don't get too hairball, without too many white knuckle moments. These tires turned out to be not much of a compromise after all: they're narrow enough that it looks like a cross bike, not a mountain bike with drop bars, and they have performed very well for riding dirt and pavement. Here's the punchline, they were $15 each, which is a pretty good deal.
The last money I spent was $10 for bar tape. So that brought the total cost of a ready-to-roll bike in at $160. I could have saved $30 by using cantilever brakes, but the v-brakes, once dialled in, provide gobs of stopping power in the dirt.
|
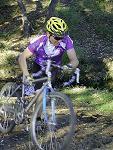
So how does it ride? The answer, great. It turned out to be the perfect solution for riding those dirt roads in Arkansas that I had always wanted to explore, and had plenty gear and rolling ability when I got back out to the pavement. Back at home, I've started using it on group road training rides during the off season, the lower gearing allowing for easy spinning up climbs which is perfect for winter. I've also tackled some trail riding with it. Since all my off-road experience has been on a mountain bike, it's been a challenge to get the hang of the lower cyclo-cross position, and with the rigid fork it's given me new appreciation for modern mountain bike suspension! It's just plain fun to ride, road and trail. I haven't tried racing it yet, I haven't reached that level of skill confidence yet. But I think it would more than suffice for the occasional cross race. If you're thinking seriously of cross racing, seriously think about getting a real cross bike.
Although I couldn't quite stay within my original budget, The bike turned out way better than I thought it would and I believe it more than met the goal of achieving the spirit of those early cyclo-cross riders. If you've got enough spare parts and a frame, it's a very cost effective project that results in a great bike for commuting, light trail riding, winter road training and maybe even that occasional cross race.