


Removing and installing rear cogsLevel of Difficulty: novice Typical Tools and Supplies Needed
This article will address the removal and installation of rear cogs on a derailleur type bicycle. Types of cog mountThe rear cogs are attached to the hub in one of two ways, either a splined fitting on a 'freehub' or a screw-on 'freewheel' |
|||
|
|||
|
|||
|
|||
 Newer
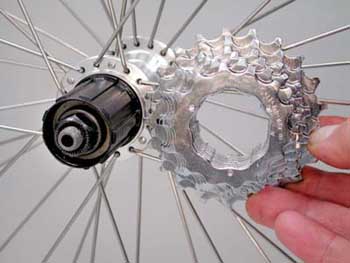
bikes tend to use a 'freehub' which is mounted to the body of the hub.
This cylindrical mechanism ratchets counter-clockwise for coasting, and
locks clockwise for driving the bike when pedaled. The freehub body has
a series of splines on the outer shell. 'Cassette' sprockets slide over
these splines. A lockring threads into the freehub and holds the sprockets,
or cogs, in place. When the cogs are removed, the ratcheting freehub remains
on the hub body. Most modern bicycles use the freehub system, and this
article will deal exclusively with freehub cog removal and fitting.
Newer
bikes tend to use a 'freehub' which is mounted to the body of the hub.
This cylindrical mechanism ratchets counter-clockwise for coasting, and
locks clockwise for driving the bike when pedaled. The freehub body has
a series of splines on the outer shell. 'Cassette' sprockets slide over
these splines. A lockring threads into the freehub and holds the sprockets,
or cogs, in place. When the cogs are removed, the ratcheting freehub remains
on the hub body. Most modern bicycles use the freehub system, and this
article will deal exclusively with freehub cog removal and fitting.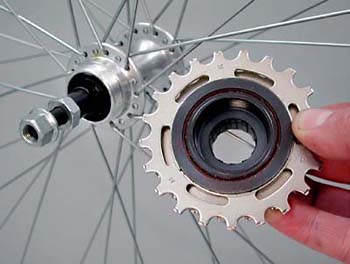 Older
bikes may have a large external thread machined into the hub. The cogs
and ratcheting body assembly, called a 'freewheel', threads onto the hub.
The ratcheting mechanism comes off with the cogs when the freewheel is
removed.
Older
bikes may have a large external thread machined into the hub. The cogs
and ratcheting body assembly, called a 'freewheel', threads onto the hub.
The ratcheting mechanism comes off with the cogs when the freewheel is
removed.Shimano type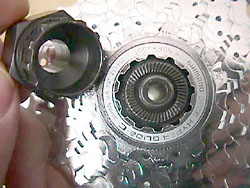
Shimano cassettes, Sun Race, Hugi, Many brands - use FR-5 lockring tool. |
Campagnolo type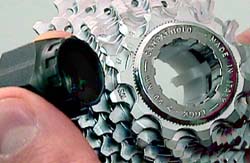 Campagnolo cassettes - use BBT-5 lockring tool |
Cassette lockring removal and installation
Shimano, Campagnolo, Sun Tour, Sun Race, Chris King, DT-Hugi, and other brands.
ith the modern cassette cog systems, all cogs are fitted with splines. Cogs slide onto the freehub body and are held in place by a lockring. The lockring sits outward from the smallest cog. Look for the word, "LOCK", and an arrow on the lockring indicating direction to turn for locking. Turn the lockring counter-clockwise, the opposite way of the arrow, to loosen it. There may be a loud noise when the lockring breaks loose. There is often knurling under the lockring to help keep it in place, and this knurling makes noise when the ring is loosened or tightened.
TOOLS: Park Tool FR-5, (For Campagnolo use BBT-5), Park Tool SR-1 sprocket chain whip (2 if possible), or large adjustable wrench or vise.
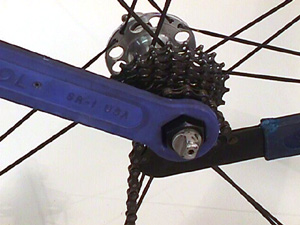
Cassette cog removal from freehub (lockring type)
- a. Mount bike in repair stand and remove rear wheel from bike.
- b. Remove quick release skewer.
- c. Inspect cassette and select correct type of remover.
- d. Engage remover into splines/notches.
- e. Install quick release skewer and install skewer nut on outside of remover.
- f. Snug skewer nut against remover. Skewer acts as a holding device for freewheel removal tool.
- g. Hold cogs in clockwise direction with sprocket chain whip tool. Turn remover counter-clockwise, using a large adjustable wrench, the hex end of another Park Tool sprocket chain whip tool SR-1, or the Park Tool freewheel wrench FRW-1. It will require force to remove the lockring. Expect to hear a loud clicking sound as the locking teeth of the lockring separate.
 h. If using a vise, grab removal tool tightly in vise with wheel held
flat. Use sprocket chain whip tool to turn sprockets counter-clockwise.
Do not hold wheel while turning sprockets, allow wheel to rotate, and
pull only on sprocket chain whip tool.
h. If using a vise, grab removal tool tightly in vise with wheel held
flat. Use sprocket chain whip tool to turn sprockets counter-clockwise.
Do not hold wheel while turning sprockets, allow wheel to rotate, and
pull only on sprocket chain whip tool.
Installing cassette cogs
Cassette freehub bodies and cassettes are often designed so the cogs will fit in only one orientation. This permits manufacturer to align "shifting ramps" to specification.
- a. Inspect splines of freehub body. Look for a wide space between splines. Inspect the internal splines of cogs. Look for a wide spline to mate with wide space in freehub body. Align splines and engage all cogs.
- b. Install spacers in same orientation as when removed.
- c. Grease threads of lockring and thread lockring into freehub.
- d. Install cassette lockring tool and install quick release skewer. Thread skewer nut on outside of lockring tool.
- e. Snug skewer nut against remover. Skewer acts as a holding device for freewheel tool.
- f. Turn remover clockwise until lockring is tight, at least 360 inch-pounds (approximately 40 Nm). For installing lockring, use of the sprocket chain whip tool is not required.
Older freehubs (non-lockring ring-type)
 Older
freehubs may have no notches or splines adjacent to axle. These older
freehub cogs did not use any freewheel removal tool. There will be a dust
cap for the hub on the right side, but no recessed notches or lockring
splines at all. The first cog acts as a lockring for the other cogs.
Older
freehubs may have no notches or splines adjacent to axle. These older
freehub cogs did not use any freewheel removal tool. There will be a dust
cap for the hub on the right side, but no recessed notches or lockring
splines at all. The first cog acts as a lockring for the other cogs.
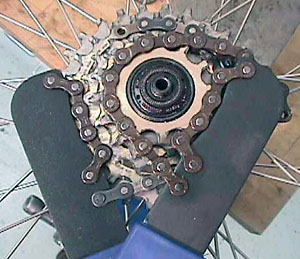
- a. Use two sprocket chain whip tools (Park Tool SR-1 or SR-2)
- b. Place first sprocket on second or third cog, holding it clockwise.
- c. Place second sprocket tool on first cog to rotate it counter-clockwise.
- d. Arrange sprocket tools so they form a "X". This gives you better mechanical advantage. See image above.
- e. Rotate first cog counter-clockwise while holding second sprocket chain whip tool. This loosens first cog. Remove cog and pull off other cogs.
Installing older non-lockring freehub cogs
- a. Grease threads of smallest cog.
- b. Install cogs and spacers on freehub.
- c. Thread on smallest cog and secure clockwise with sprocket chain whip tool.
Suggested Park
Tools
- Freewheel/cassette remover FR series
- Sprocket Tool (chain whip) SR-1, SR-2, or HCW-14
- Freewheel tool wrench, SR-1 or FRW-1 (or a large adjustable wrench or vise)
- Grease, such as PPL-1 or anti-seize type lubricant