


Wheel truing and spoke tensioning
Level of difficulty: Intermediate to advanced
Tools needed
Wheels and truing
Truing procedure
Lateral truing
Radial truing
Centering
Typical tools and supplies needed
- Truing stand [1]
- Spoke wrench, purchased to fit nipples
- Dishing tool (optional, but good for accurate work)
- Light lubricant
- Rags
Wheels and truing
The wheels drive the bike forward when we pedal, allowing us to roll down the road or trail. Having wheels that spin straight and round adds to the bike's performance. Spokes allow adjustments to the tension on the rim that will affect how straight the wheels spin. Some wheels use non-serviceable blades or a large disc rather than spokes. For most disc or blade model wheels there is no adjustment or repair possible other than replacement.
The wheels also help slow the bike. Rim caliper brakes, such as linear pull, cantilever, side pull, and dual pivot brakes use the rim sidewall as the braking surface. There may be problems during the ride and when braking if the wheel wobbles side to side, or is "out-of-true". Brake pad adjustment will also be difficult with an out-of-true wheel.
The typical bicycle wheel is composed of a rim suspended with tensioned spokes around a center hub. Each spoke pulls on a section of rim. Spokes coming from the right side hub flange pull the rim to the right. Spokes coming from the left side hub flange pull the rim to the left. Spokes attached at the rim are then offset in a left-right-left-right pattern to counter the pull of the other side. Having all the spokes tight with fairly even tension makes the wheel true and strong. Changes to spoke tension will pull on the rim and affect its true. This process is called "truing".
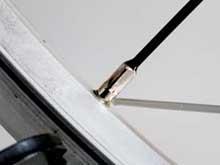
Truing is occasionally needed to keep the rim running straight as it spins between the brake pads. Spoke tension is adjusted by tightening or loosening a threaded nut, called the nipple, at the end of the spoke. Spoke threads typically use right-hand threads. Although a common phrase among mechanics is to "tighten the spokes", it is the nipple that is turned, not the spokes.
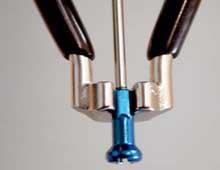 |
To adjust tension at the nipple, first select the correct wrench. Spoke nipples are typically square, and come in different sizes. The correct wrench is the smallest size that can be used, even if it seems slow putting the wrench on the nipple. Make sure the wrench is fully engaged on the nipple before turning. A wrench that is partially engaged may damage the nipple and make truing difficult. [2] |
When truing a wheel, the wrench and nipples may end up being viewed upside down. This happens if the wrench and nipple is viewed below the axle center. The wrench will appear to the mechanic as turning to the left when tightening the nipple. Do not allow this to confuse you. Keep in mind that the nipple is rotating around the fixed spoke, the spoke does not rotate. If in doubt, imagine a screwdriver at the nipple end, and turn it clockwise or counter-clockwise as needed.
There are four basic aspects of wheel truing. These are lateral true, radial true, rim centering over the hub, and spoke tension. Professional mechanics are able to adjust spoke tension so each aspect is optimal. Using truing stands, centering tools, spoke tensiometers, and experience, a professional will produce a durable and strong wheel.
Lateral true: this true is also called "rim run-out", and is the side-to-side wobble of the rim as the wheel spins. This aspect is the most critical to brake caliper settings.
Radial true: this is the amount of up and down wobble. If the wheel becomes out-of-round, it wobbles up and down with each revolution. In severe cases this will affect brake pad placement and can be felt by the rider as a bump every wheel revolution.
Rim centering or "dish": this refers to the rim being centered in the frame. If the rim is offset in the frame to either side it may be difficult to adjust the brakes. Severe cases of poor centering can also cause handling problems, because the rear wheel will not track behind the front wheel.
Tension: this is simply the tightness of the spokes. Spokes are tensioned just like other fasteners. Spoke tension is best measured using a tool called a spoke tensiometer, which flexes the spoke using a calibrated spring. With some experience, spoke tension can be estimated by squeezing pairs of spokes and feeling the deflection. However, this squeezing technique can be quite deceiving and inconsistent
Generally, spokes should be as tight as the wheel allows. Too low of spoke tension tends to decrease spoke life by increasing the cycles of stress a wheel sees every time it rotates under the rider. Too high of tension may damage the rim or hub by pulling too much. The rim may develop cracks where the nipple exits the rim, or the hub flange may crack.
Truing Procedure
Lateral truing
The procedure described here emphasises lateral true, which most affects the caliper brake. The idea is to get the wheels true enough to avoid hitting the brake pads. The other aspects of truing such as radial, centering and tension are important. For the novice mechanic, it is best to begin with lateral true in order for the brakes to work properly.
 |
A "mechanic's eye" view of the rim.The spoke nipples labelled A, C, and E are on the left side of the rim and come from the left side flange. Spoke nipples B, D, and F are on the right and come from the right side flange. Left side spokes tend to pull the rim toward the left. Their pulling is offset by the pull of spokes on the right. Each nipple affects a relatively wide area of the rim. For example, spoke C will pulls mainly adjacent to its location, but will also effect the rim up to and even past A and F. Tightening nipple C increases spoke tension and moves that section of rim to the left. Tightening nipple D will tend to move the rim to the right. Loosening nipple C will also tend to move the rim to the right, because on the constant pull of D. |
In order to see rim movement, a steady pointer is useful as a reference. A wheel-truing stand allows easier and more accurate work. It is also possible to use anything that can hold the wheel steady as a truing stand, such as the frame. A pointer can be created by using the brake pads. Radial truing and rim centering are typically not an issue when only minor corrections are made. It can help to remove the tire while truing.
1 Remove wheel from bike and remove tire. (Note: for lateral truing, the tire can remain in place.)
2 Mount wheel in truing stand, with right side of the wheel on the right side of the stand.
 |
3 Lubricate the threads of the spokes and where the nipple exits rim. |
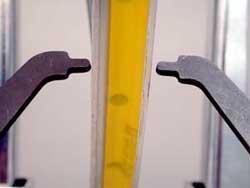
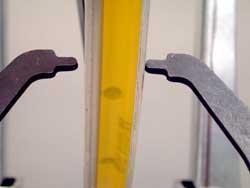
4 Bring calipers up to rim level. Generally, place caliper tips close to outer end of braking surface.
5 Spin wheel. Adjust caliper close to rim. Keep moving caliper until either side begins to lightly scrape rim. Only a light scrape is desired, bring caliper slightly away if scraping heavily.
6 Stop wheel where rim and indicator are closest, at the point of the scrape.
7 Rotate rim back and forth past caliper and find center of rim deviation.
8 If the rim deviation is moving toward the indicator, this section of rim needs to move away from caliper.
 |
9A If rim touches left side caliper, find closest nipple to center deviation coming from right side of hub flange. |
 |
9B If rim touches right side caliper, find closest nipple to center deviation coming from left side of hub flange. |
10 Tighten nipple 1/2 turn. Move wheel back and forth in this area and check deviation again.
11 Spin wheel and locate another side-to-side deviation using indicator. Again slow and stop the rim where rim approaches indicator. Locate closest nipple opposite to center of deviation tighten nipple. If nipple appears especially tight, loosen spoke on same side as rub on indicator.
12 Repeat until wheel is true. Wheel is adequately true if it wobbles less then 1/16" (1.0mm).
13 Clean rim braking surface with a solvent such as rubbing alcohol or a window cleaner.
Radial Truing
The wheel rim may appear to move in and out toward the center. Another way to view it is up and down. This radial aspect of the wheel can be affected by spoke tension. Sections of rim can be moved toward the hub by tightening spokes. Alternatively, sections of rim can move slightly outward by loosening spokes. It is typically best to work using pairs of spokes. By working with adjacent left-right spokes there is less of a tendency for the wheel to become laterally out of true.
1 Remove wheel from bike and mount in a truing stand.
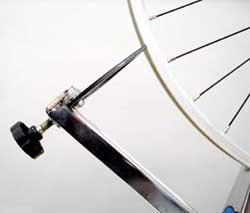 |
2 Bring caliper close to lower outside edge of rim. |
3 Spin rim and bring calipers slowly closer to rim until there is a very light rub.
4 Stop rim at light rub. Move rim back and forth through rub and locate center of deviation. This section of rim is relatively further from the hub than the rest of the rim. It needs to move closer to hub.
 |
5 Tighten the two spokes in the middle of the rub. Tighten each the same amount, beginning with 1/2 turn. |
6 Move the rim back and forth through the selected area. Repeat tightening if necessary.
7 Spin the rim and move the calipers slightly closer to the rim. Correct rub by tightening a left-right pair at the center of the rub.
8 After making three radial corrections, stop and double check lateral true. Correct lateral true as needed.
9 After making several radial corrections by tightening, the rim may show only areas moving toward the hub. It is necessary to loosen these area to make the rim rounder.
10 Spin the rim and move caliper for a light continuous scrape. The area not scraping are called low spots, or dips, and need to move away from the hub to be corrected. Isolate the center of the worst low spot
11 Loosen two spoke on either side of the center of the low spot. Spokes should be adjacent left side-right side pairs.
12 Repeat procedure on other low spots.
13 Wheel is adequately trued for round when the deviation from the low spot to the highest spot is about 1/32 of an inch (about 0.5mm)
Note: If the wheel rim has been damaged and deformed from impact, such as during riding or even shipping, it may not be possible to correct the rim to a tight tolerance.
Centering or Dish Adjustment
The rim should be centered to the hub so that it sits adequately centered in the bike. If a rim appears to be centered in the front forks or the rear triangle, it is usually considered adequately centered. The most accurate method to check centering over a hub is with a dishing tool.
1 For accurate results, remove tire from rim and check wheel for adequate lateral (side to side) true.
2 Holding wheel flat with the right side upward. If it is a front wheel, pick and mark a side as the right side.
|
|
3 Place both feet of tool on rim and adjust center pointer unit it lightly contacts face of locknut. Do not measure off of axle end |
4 Lift tool and flip wheel with left side facing upward.
5 Note indicator relative to locknut face. There are three possible results:
|
A Both feet of WAG-1 rest on the rim and the indicator point lightly contacts left locknut face. This needs no correction, the rim is centered to locknuts. |

|
B Both feet of the WAG-1 rest on the rim, and there is a gap between
the indicator point and locknut face. NOTE: Rim is centered to hub one-half
of distance from indicator point to locknut. Example, if indicator point
is 0.5mm from locknut, wheel is centered to 0.25mm. |
|
C Three point contact of both feet and indicator point at locknut
is impossible. While indicator is on locknut, one foot rests on rim, other
foot is higher than rim. If indicator rests on locknut, only one foot contacts
rim. |
6 To move rim centering, turn same-side spoke nipples evenly. Tighten left side spokes evenly to move rim left. Tighten right side spokes evenly to move rim right. Alternatively, loosen left side spokes to move rim right. Loosen right side spokes to move rim left.
7 After turning spoke nipples, check rim for adequate lateral true, and check centering again
When making corrections to dish, remember that it will also make changes to over tension. If you correct by tightening one side, it will add tension. If you correct by loosening, the entire wheel will become looser.
Content for this page courtesy Park Tool. For more on Park's range of tools and workshop supplies, see: Park Tool 's website
Notes
- Truing Stand, TS-2, TW-7, or TS-5
- Spoke Wrench: SW-0, SW-1, SW-2, SW-3, or SW-7
- Dishing Tool: WAG-1 or WAG-3
[2] For the commonly available Park Tool spoke wrenches, the smallest size is the black (SW-0), followed by the larger green (SW-1), and then red (SW-2) and blue (SW-3).
- The SW-0 (black handle) is sized for 3.22mm (0.127in) nipples and fits Wheelsmith®, Marwi® and DT®, Edco® as well as other brands of nipples.
- The SW-1 (green handle) 3.3mm /80 ga./0.130in nipple
- The SW-2 (red handle) 3.45mm /80 ga./0.136in nipple
- The SW-3 (blue handle) 3.96mm /105 ga./0.156in nipple