


Trouble Shooting a Creaking and Squeaking Drive TrainLevel of Difficulty: Simple to intermediateCreaking and squeaking noises that occur while riding are some of the most irritating bike problems. They often appear to come from the drive train but because they are transmitted through the structure of the bike can actually start in many other places. The secret to diagnosing them is to methodically inspect the whole bike, not to assume that because a noise coincides with pedalling it is coming from the drive train.Useful Tools and Supplies
Creaking and squeaking noises can be a sign of more serious problems. Damage to component parts may result if they are left unattended. Creaking is usually caused by two things rubbing together, such as a crankarm rubbing on a spindle. Many of the solutions below rely on adequate torque on the parts. For more on torque see Park Tool's torque table. Thread preparation is also critical. Correctly diagnosing the source of the noise can be difficult. It may help to have a friend assist you. Have them flex the parts while you listen and feel for noise. Creaking will often resonate enough to be felt as well as heard. If during a ride you hear a creak or squeak once per revolution, it is probably located in the crankset and pedal area. If the noise is once every 2 - 3 revolutions, it may be in the chain. There can be several causes of creaking. You may need to proceed through the drive train step by step, part by part to eliminate potential problems. Here are some of the possible sources and remedies for drive train creaking. Crankarms |
|||
|
|||
|
|||
|
|||
|
|||
|
|||
|
|||
|
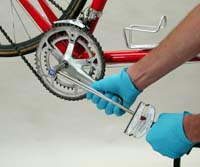 The most common
cause of creaking is the crankarm being loose on the spindle. Remove the
crank bolts, lubricate the threads and under the bolt head, and re-install.
Tighten the bolts to the manufacturer recommended torque. Use a
The most common
cause of creaking is the crankarm being loose on the spindle. Remove the
crank bolts, lubricate the threads and under the bolt head, and re-install.
Tighten the bolts to the manufacturer recommended torque. Use a 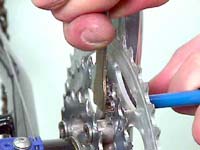 The chainrings
are held to the cranks by chainring bolts. Use a hex key wrench and check
each bolt. Hold the back chainring nut from spinning with a
The chainrings
are held to the cranks by chainring bolts. Use a hex key wrench and check
each bolt. Hold the back chainring nut from spinning with a  If you have
riding shoes, the cleats under the shoe can loosen and also cause noise.
Use a mild grade of thread locking compound or grease on the bolts, and
tighten them fully. Even regular "street shoes" on a platform pedal can
cause noise. A shoe lace can tap against a crankarm, and the rubber can
move and squeak under the sole.
If you have
riding shoes, the cleats under the shoe can loosen and also cause noise.
Use a mild grade of thread locking compound or grease on the bolts, and
tighten them fully. Even regular "street shoes" on a platform pedal can
cause noise. A shoe lace can tap against a crankarm, and the rubber can
move and squeak under the sole.
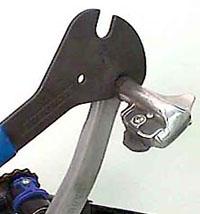 Tighten pedals
into crankarms. The torque typically recommended is 300 inch-pounds, which
is about 50 pounds of effort hold a wrench six inches from the pedal.
Pedal bearings can also creak. Spin the pedal and listen for noise. Different
makes of pedals have different bearing service options.
Tighten pedals
into crankarms. The torque typically recommended is 300 inch-pounds, which
is about 50 pounds of effort hold a wrench six inches from the pedal.
Pedal bearings can also creak. Spin the pedal and listen for noise. Different
makes of pedals have different bearing service options.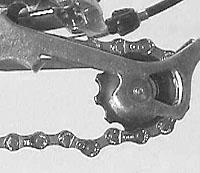 Listen
for dry links by spinning the chain in a repair stand. Lubricate as necessary,
with a drop of lubricant on each roller and rivet. Look at each and every
rivet to check misalignment in the chain plates. Inspect for twists in
side plate, or burrs, cuts or other damage to the side plates. Place chain
in a gear combination that relaxes the rear cage, and spin chain backwards.
If the chain hops as it passes of the pulley wheels, it may have a tight
link. This can be fixed using the tight link cradle of a
Listen
for dry links by spinning the chain in a repair stand. Lubricate as necessary,
with a drop of lubricant on each roller and rivet. Look at each and every
rivet to check misalignment in the chain plates. Inspect for twists in
side plate, or burrs, cuts or other damage to the side plates. Place chain
in a gear combination that relaxes the rear cage, and spin chain backwards.
If the chain hops as it passes of the pulley wheels, it may have a tight
link. This can be fixed using the tight link cradle of a  |
 |
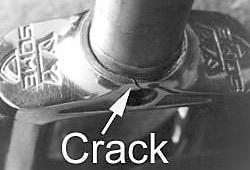 |
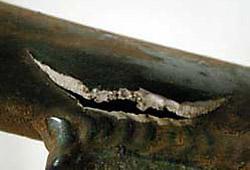
It is possible non-drive train creaks will masquerade as coming from the drive train. After checking other possibilities, check the frame itself for problems. A crack in a weld or a glued joint that is separating can also cause a creaking sound. If you suspect a crack, stop riding the bike and take it to a professional for further evaluation. The images below show a crack above the derailleur mount, a chain stay that has failed, and a fork crown cracked. None of these bikes were crashed or wrecked. Once a crack has developed, repair is difficult and is often practically impossible.
Saddle
The saddle may also be loose on the seat post, causing a creak as the saddle rails move and rock. Check security of the saddle rail binder bolts. The seat post can move slightly in the frame seat tube, especially in the fit inside the frame is marginal. Knurling the post, or even cutting off excess post may help.
Headset
 |
 |
The headset connects the main frame to the fork and front wheel. Some headsets rely on a tight pressed fit on parts into the frame or fork. If the fit is not properly tight the parts may move and creak when stressed. In some cases the fit can be improved using a "retaining compound". It may be best to consult a professional for this repair.
Stem and handlebars
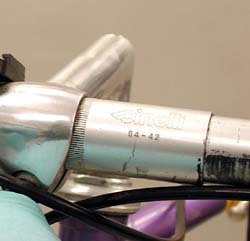 A loose stem or bar bolt may also cause a creaking
sound. If the bolt's threads are dry and without lubrication, they may
not secure properly. Remove bolt, grease the threads and under the bolt
head, and re-secure. Some handlebars use a center section that is pressed
on, called a sleeve. This sleeve may become loose with use, and may begin
to creak. Replacement is the best repair in this case. You may try a penetrating
thread locking compounds if you have one, but it is likely to keep creaking.
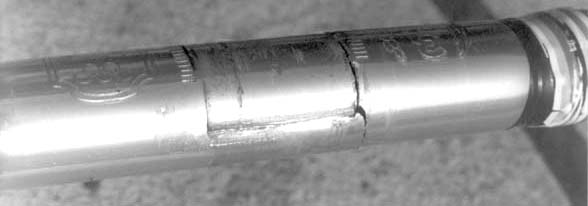
A center sleeve is seen in the left image. In the above, the bar had no
center sleeve. However, the bar developed a crack where it was held by
the stem. A catastrophic failure was imminent.
A loose stem or bar bolt may also cause a creaking
sound. If the bolt's threads are dry and without lubrication, they may
not secure properly. Remove bolt, grease the threads and under the bolt
head, and re-secure. Some handlebars use a center section that is pressed
on, called a sleeve. This sleeve may become loose with use, and may begin
to creak. Replacement is the best repair in this case. You may try a penetrating
thread locking compounds if you have one, but it is likely to keep creaking.
A center sleeve is seen in the left image. In the above, the bar had no
center sleeve. However, the bar developed a crack where it was held by
the stem. A catastrophic failure was imminent.
Rear Cogs
The rear cogs are not a likely source of a creak, but they should be checked in the interest of thoroughness. For cassette cogs, check security of lockring. Inspect teeth for burrs and wear, which may cause a pop noise rather than a creak.
Content for this page courtesy Park Tool. For more on Park's range of tools and workshop supplies, and further repair and maintenance help see: Park Tool's website