


Adjusting dual pivot caliper brakesLevel of Difficulty: intermediateProperly adjusted brake systems require attention to small details. This article will discuss caliper arm adjustment, brake attachment to the frame, pad adjustment to the rim, pad centering, and pad clearance. For purposes of this article, the terms "left" and "right" will be from the "mechanic's point of view", not from sitting on the bike. Typical Tools and Supplies NeededUseful Tools and Supplies1
Dual pivot conceptsThis article discusses primarily Shimano® brakes, but the concepts also apply to Campagnolo® type brakes.
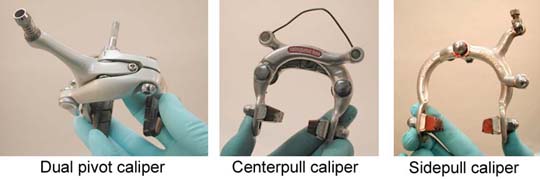
Dual pivot caliper rim brakes are used on many modern road bicycles. The design is a combination of a "center-pull" and a "side pull" brake. One caliper arm has its pivot off of wheel center, the other arm pivots directly over the wheel center.
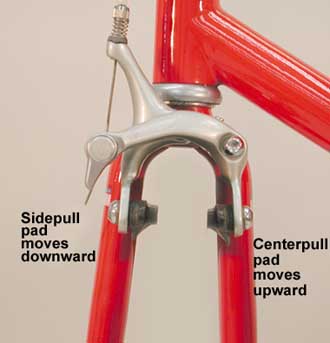
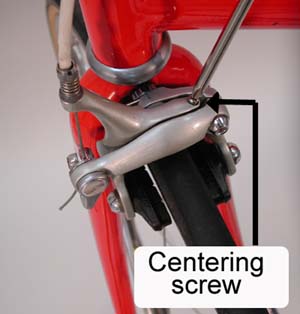
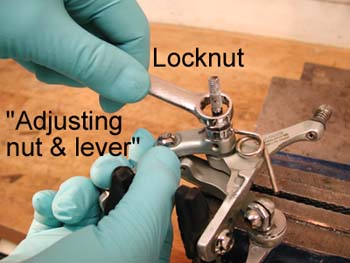
Left side and right side dual pivot brake caliper arms move on separate pivots. Pads move in different arcs as they approach the rim. The left side arm acts as a sidepull. This pad swings downward as it travels toward the rim. As this pad wears thinner, it will travel downward even more. The right side acts as a centerpull. The right pad will travel upward as it approaches the rim. Set the right pad lower on the rim braking surface, and the left pad high on the braking surface. |
||
|
|
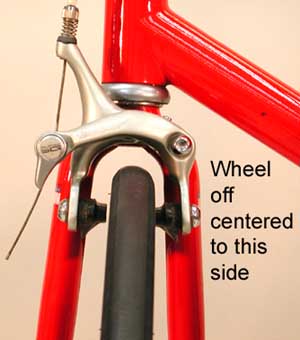
1 Inspect the wheel for centering in the frame/fork. Pad alignment is effected by wheel centering. The image left shows a wheel off to the mechanic's right. Center wheel before adjusting brake.
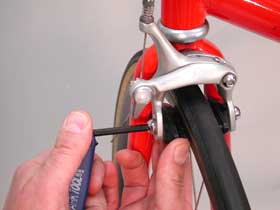
2 Inspect that caliper is approximately centered to wheel (after wheel is centered in frame). Loosen mounting nut and move caliper arms until centered to rim. Re-tighten the mounting nut.
 |
3 Loosen and lubricate threads of pad bolt/nut. Adjust height of right pad to strike upper edge of braking surface. Adjust height of left pad to strike lower edge of braking surface. Most dual pivot pads adjust only for height and tangent. Vertical face and toe alignments are not typically adjustable on dual pivot calipers. Tighten pad-fixing bolts.
4 Squeeze lever to test pad clearance. Use barrel adjuster to adjust pad clearance. Set clearance for approximately 3-4mm (1/8") per side from pad to rim. Draw slack from system using inner-wire pinch bolt if barrel adjuster is set out to its limit.
 |
 |
6 For Campagnolo® dual pivot type brakes, the centering screw is located on the left caliper arm.
NOTE: It is generally not recommend that dual pivot brakes be bent for "toe". On less expensive brakes with thin caliper arms, it is sometimes possible to bend the arm so the leading edge of the brake contacts the rim first. This helps reduce brake squeal. If the caliper arms are thicker and stiffer, as with better quality brakes, there is the risk of braking a caliper arm rather than bending it. If squeal is a problem in the brake, consider filing the pad so there is a slight gap at the back of the pad.
Caliper Arm Pivot Adjustment
Because each arm has a separate pivot, each arm pivot is adjusted separately. Neither arm should have play, or a back and forth knocking. Additionally, neither arm should bind as it moves. The caliper arm bridge behind each arm is threaded for each arm pivot bolt. Behind each pivot bolt is a locknut. Dual pivot use a spring to push open the side-pull type arm. A setscrew in the side-pull type arm pushes on the center-pull arm to open it.
Adjustment Procedure
1 To adjust the center pivot of the right arm, begin by removing the brake from the bike.
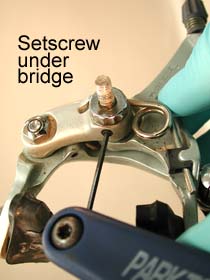
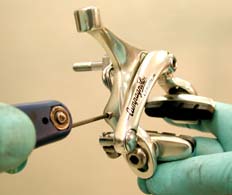
2 Loosen the set screw located under the bridge. Not all brands
and models use a setscrew on this bridge. Campagnolo® uses a setscrew
in the locknut behind the brace.
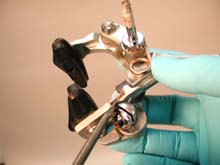 |
3 Release the spring tension by un-hooking the spring from the right caliper arm (center-pull type arm). Use care not to damage plastic spring-guide.
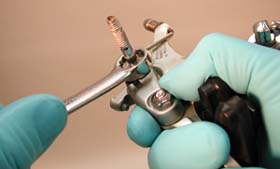 4 Loosen locknut
at base of mounting bolt. It is not necessary to remove locknut. Shimano®
typically uses a 12 point 13mm nut. Other brands vary.
4 Loosen locknut
at base of mounting bolt. It is not necessary to remove locknut. Shimano®
typically uses a 12 point 13mm nut. Other brands vary.
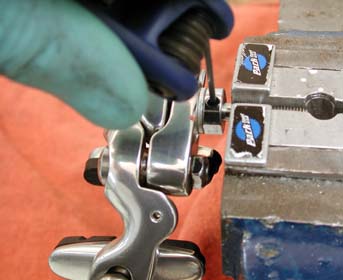
5 Mount an L-shaped hex wrench vertically in a vise. This will act to hold the pivot bolt and free up your hands.
6 Pivot center pull side inward to expose center bolt. Place brake down on hex wrench. Center bridge is threaded, and can also act as its own lever. Turn brace clockwise slightly (10-15 degrees) to tighten adjustment. Hold brace and fully secure locknut (about 70 inch-pound torque). Test center-pivoting arm for knocking and play. Test arm for adequate free movement. If arm binds, loosen locknut and loosen bridge slightly. Re-secure locknut and test again. Repeat as needed.
 7
Move caliper arm to full open position and reattach return spring. Take
care not to damage plastic spring-guide.
7
Move caliper arm to full open position and reattach return spring. Take
care not to damage plastic spring-guide.
8 Mount brake to frame, or use soft jaws in vise to hold mounting bolt.
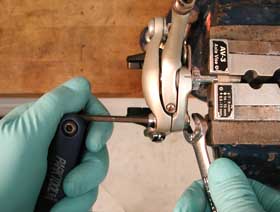
9 Use hex wrench to hold right-arm adjusting bolt, and loosen locknut on backside of arm. Tighten adjusting bolt slightly. Hold bolt and secure locknut fully. Test for play in arm, and squeeze arm to rim and test for adequate free movement.
Mount caliper to bike and adjust pads as described above.
Suggested Park Tools
- PCS-1 or PCS-4 Repair Stand
- AWS-10 Hex wrench set
- Polylube® 1000 grease
- AV-3 soft jaws